Zombicide: First Paints
With my freshly primed minis all safely packed away in the Zombicide box… I forgot about it for a few months. I got distracted with other projects but I’m finally back on board and ready to put some real paint on these babies!
There are 8 different types of each zombie (not counting survivors and the abomination) and 8 copies of each model. There are a number of different ways I could have gone about painting all of these. Obviously I could paint each one individually from start to finish before turning to the next but I thought this was very inefficient and might end up with a lot of the same looking zombies. So I decided I was going to paint them all in small groups to allow for some variation but still break up the monotony that would creep up painting 64 sets of shoes/tops/bottoms in a row. I decided to group them by mould type so I could show some variation so though the base mould was the same for these zombies, they would all look sufficiently different.

The first zombie was this dude in a suit. I did end up painting him from start to finish first just to make sure if I was going to make any newbie mistakes at the very start - it wouldn’t be repeated in 8 models. I think he turned out fairly well, though there are two ‘blood’ colours: Crusted Sore which is a dull red and Glistening Blood which is bright blood and I may have used too much of the duller colour - but maybe he hasn’t eaten in a while!
After my first dude was done I started to be a little more productive. I must admit I did go out and buy green and purple paint - Caliban Green- from Citadel’s _base colour range and P3’s Beaten Purple. I wanted each of the 8 models in each mould to have a different ‘main colour’ each, so there’ll be a purple and a green zombie in each set. I painted the remaining 7 models at the same time so all the white shirts and black shoes/belts/pants were done together so the paint didn’t dry out.
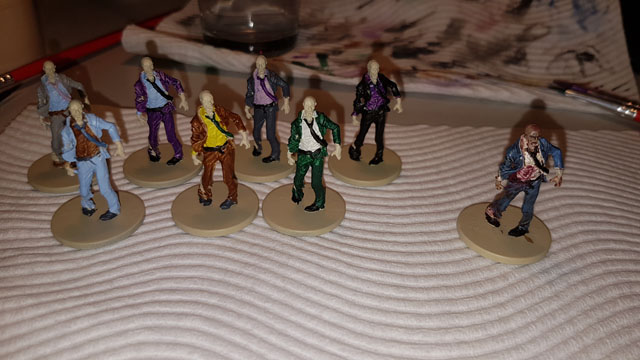
Here’s a picture of all the base colours on each model, along with my finished zombie.

With each base colour done, I started with the wash. A wash is a very thin, watery paint that you apply liberally to the whole model; it runs into the creases and crevaces to emphasise the features of the model (clothes, face, etc.) The Army Painter Zombicide Paint Set comes with a few washes: Zombie Shader and Dirt Spatter which I used in different amounts on each zombie depending how ‘dirty’ I wanted them to look. For some I covered with the wash, dried the brush off, then used the brush again to soak up some of the ink leaving only bits in the creases whereas others I went nuts to make a very dirty zombie.

Many people also recommend drybrushing after the wash to emphasise the parts that stick out from the model at this point, but I didn’t try that on these first zombies, some paint colours I used were mixes and I was worried about not matching them properly.
Now for the really fun and more forgiving part; bloooood! I wasn’t as careful on some of the belts and got some extra paint especially on the hands of my zombies so there were already places I wanted to drench in blood. As I said there are two different coloured bloods, one for a more old-blood look and one for very fresh. I tried to think about what these zombies might have done or how they would get blood on various places and just mixed it up, I think they turned out great!
When I was happy with the final colours, I busted out the cardboard painting shelter again and repeated the same procedure as I did for priming the models, but using the matte finishing spray instead to seal the paint and protect my hard work.

All in all I think my first run of zombies turned out pretty well… I only have to do it another 7 times for this set… then the survivors… and the other expansions… I think there’ll be a fair few more posts on painting!